How To Enter a New Dividers Store
Faq
Not everyone who has access to edit stores has access to all of the fields listed here. If you don't see one or more of the fields listed here and you require access to them, speak to your manager.
Tip
Keep track of your place below by clicking on the gray checkmarks.
Caution
This step is very important. Duplicate stores are easy to create, but are the leading cause of overbooking.
- Check to see if the store is already in the system. When checking for
existing stores, be sure to account for potential variations and
misspellings in the name. For example, "Fort Collins" = "Ft. Collins"
= "Fort Colins", "18th St" = "18th Street", etc.
- Filter by Store Number
- Filter by Address
- Filter by City/Town
- Filter by Postal Code
Tip
If all you have is the banner, you can use the Quick Entry form and come back later to fill out the rest of the information.
- Start a new Dividers Store Document. If the Quick Entry form is displayed, click the "Edit in full page" button at the bottom-left of the form.
- Fill out the form as described below, ignoring any sections or fields that are not listed.
- Click the blue "Save" button in the upper-right corner above the form. The page will refresh and the new Dividers Store Document will load.
- Scroll down to the ADDRESS AND CONTACT Section and click "New
Address". You will be taken to the new Address form. Fill out the form
following the instructions for entering
addresses. After Saving the new Address form (you
may need to click "Save" a second time"), you will be taken back to
this form.
- Repeat for each Address.
- Scroll down to the ADDRESS AND CONTACT Section and click "New
Contact". You will be taken to the new Contact form. Fill out the form
following the instructions for entering contacts.
After Saving the new Contact form (you may need to click "Save" a
second time"), you will be taken back to this form.
- Repeat for each Contact.
- Scroll down to the PRIMARY ADDRESS AND CONTACT DETAIL Section.
- Select the Store Primary Contact from the list of options.
- Select the Store Physical Address from the list of options.
- Save the document for the final time.
Dividers Store Form
Fields marked with an aserisk (*) are required, but all fields should be filled out if possible.
Top Section
- Banner*
- Fill this field out with the store banner (name), e.g. "Vons".
- Store Number
- Fill this field out with the store number where avaialable. The store number is the number assigned to the store by the chain for identification purposes.
- Chain
- Select the store's chain in this field, e.g. "Kroger".
- Division
- Select the chain's division the store belongs to. The chain should be selected first.

STORE STATUS Section
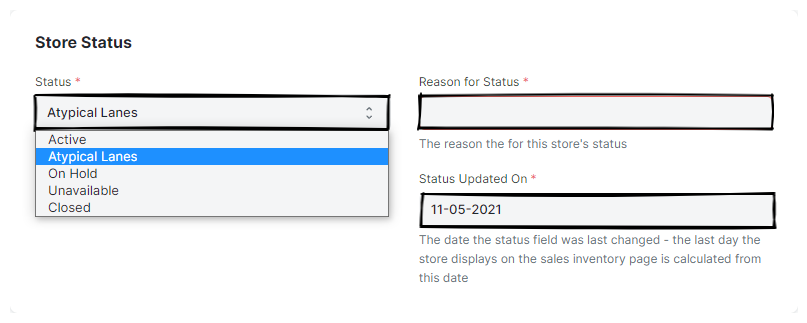
- Status
-
Indicate whether we can place ads in the store by selecting the appropriate status here.
- Active
- No restrictions.
- On Hold
- We are not currently selling the store.
- Unavailable
- The store is not available for us to sell.
- Closed
- The store is physically closed.
- Inactive Reason(*) (hidden, unless a status other than "Active" is selected)
- If the store is not Active, select the appropriate reason here.
- Status Updated On (hidden, unless a status other than "Active" is selected)
- This field defaults to today's date, and typically should not be changed. This field should reflect the day the store was made inactive.
INTERNAL TRACKING Section
- Source*
- Select the source - i.e. who gave us the store - here.
- Store Tags
- Select any Dividers Store Tags that should be assigned to the store. Tags are Tags may or may not be visible to sales on the sales inventory page, according to the configuration of the tag.
Warning
If the Document does not save and it complains that a
Dividers Store Reference [reference name] already exists
the store reference you are entering is already associated with a different Dividers Store. You should look up the other store and sort out the store reference issue before entering in the new store, since it is highly likely the new store is a duplicate.
- References
-
Enter any external references here - e.g. NAM ID, AdDividers ID, etc.
- Type
- Select the reference type. This is the group or organization that owns the list. For example, "NAM", "AdDividers".
- Reference
-
Enter the ID the group mentioned under "Type" uses to identify the store in their system. Note that "NAM" uses the format:
[0-9]*-[USA|Canada]For example, "1234-USA", or "1234-Canada".
![]()
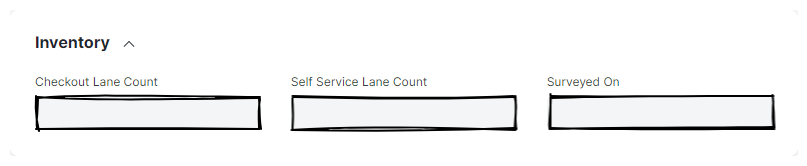
INVENTORY Section
- Checkout Lane Count
- Enter the number of full-service checkout lanes here.
- Self Service Lane Count
- Enter the number of self-service checkout lanes here.
- Surveyed ON
- Enter the date the store inventory was taken here.
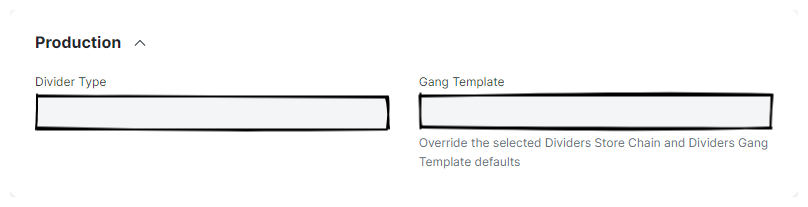
PRODUCTION Section
- Divider Type
- Select the type of divider the store accepts here.
- Gang Template
- If you wish to select a specific Dividers Gang Template, select it here. This will override the default template used by both the Dividers Store Divider Type and Dividers Store Chain.
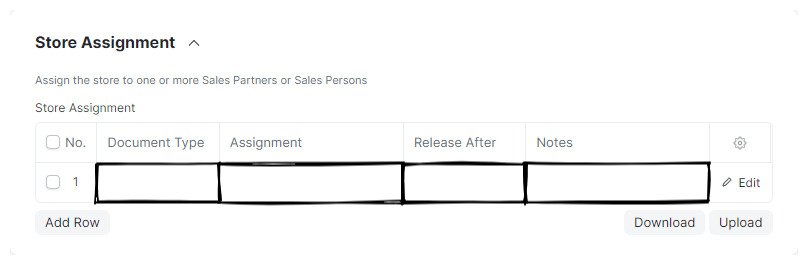
STORE ASSIGNMENT Section
- Store Assignment
-
This Table Field is used to assign the store to one or more Sales Persons or Sales Partners.
- Document Type
- Select the DocType that will be used for the assignment, either "Sales Person" or "Sales Partner". This field determines the options that are available under the "Assignment" column.
- Assignment
- Select the Sales Person or Sales Partner that will have access to the store.
- Release After
- Select the last day you wish the assignee to have access to the store here.
- Notes
- Enter any notes that describe the assignment here.
STORE ASSIGNMENT OVERRIDE Section
Help
This section of the DocType is used to temporarily override any existing store assignment(s). While the override is active, only the Sales Person or Sales Partner to whom the override applies is permitted to see the Dividers Store on the Sales Inventory.
- Document Type
- Select the DocType that will be used for the override, either "Sales Person" or "Sales Partner". This field determines the options that are available under the "Assignment Override" field.
- Assignment Override
- Select the Sales Person or Sales Partner that will temporarily have exclusive access to the store.
- Release After
- Select the last day you wish the assignee to have exclusive access to the store here.
- Notes
- Enter any notes that describe the assignment override here.
